Sunday, November 29, 2015

The Motorcycles I have owned

My Bikes
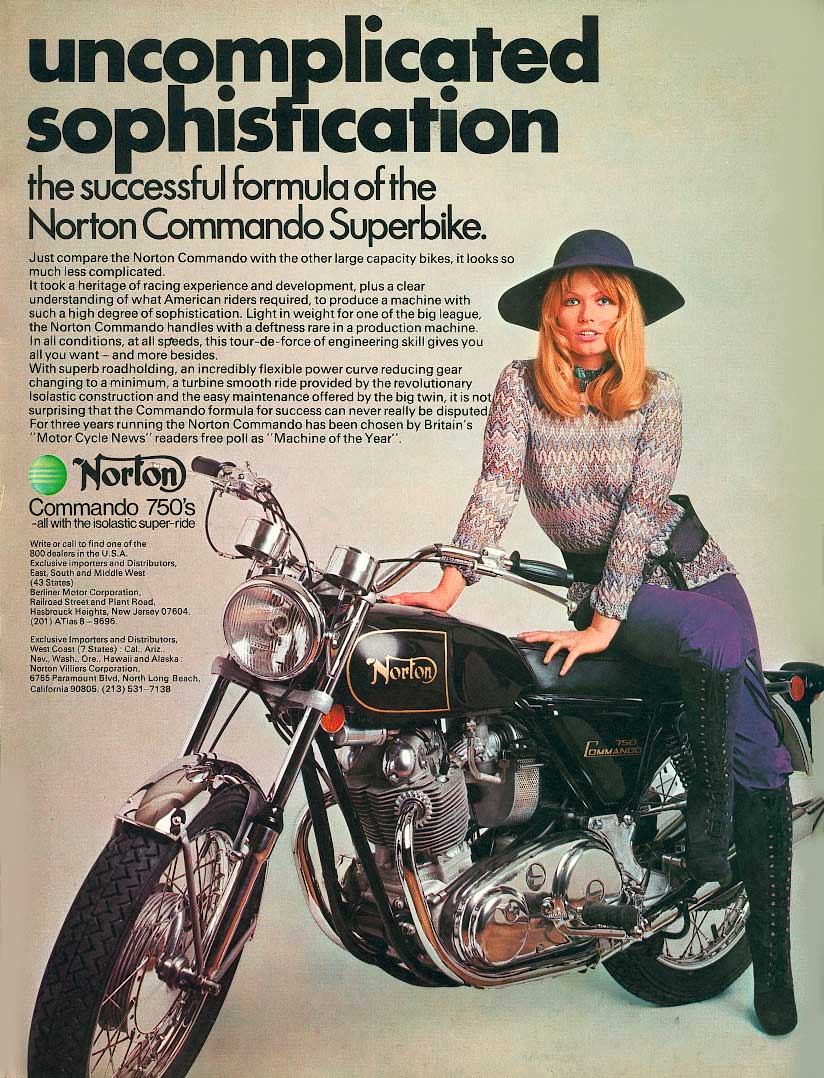
     I guess in order to tell the story of my motorcycle history I should start by saying that before I enlisted in the U.S. Army I really never really had and great desire to own or ride a motorcycle.  As a matter of fact I didn't even think about them until it was almost time for me to be discharged, and then it happened.  I feel like this is the beginning of one of those Hallmark Channel love stories that my wife just adores.  "I didn't mean to fall in love, I wasn't even looking for romance, I didn't want any attachments or anything to hold me down once I was out of the Army.  But then one day there it was, a brand new 1970 Norton 750 Commando in metal-flake purple looking like it was ready to fulfill all my fantasies"  Okay so now it's sounding more like the adult cable channel.  In reality it belonged to a friend of mine and fellow GI who had just plunked down a good bit of his hard earned combat pay which he had gleaned from his all expense paid visit to that Asian paradise know as South Vietnam.
     It was the most beautiful thing I had ever seen and I decided right then and there I must have her, uh!  I mean it.  Just one problem though, when I asked him how much it had cost him I realized that when I got out and returned home I would be about $400 short of my dream to place a Commando between my legs, alright now that sounds just downright creepy so enough of the sexual fantasy metaphors.  Anyhow I started looking at Triumphs which were slightly less money but again I found that my first choice the 650 Bonneville was still out of my price range by about $200.  Now I know what you are thinking $200 that's chicken feed, but if  you adjust it to today's dollars it would be about 1200 bucks, and I was just getting out of the service and had no permanent job yet.
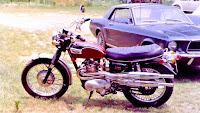
Wow look at those mufflers!
    So did I go back to work and save up the other $200, you are kidding aren't you?  I was like the seventeen year old boy out on a date with the easiest girl in his class, you might conservatively say I was hot to trot!  I looked around the showroom and sitting back in the corner was a black and red Trophy 500 with the biggest set of side pipes I had ever seen, (I'm sorry, I did promise to knock off the sexual metaphors).  Why there was enough chrome on those babies to do complete Buick Roadmaster.  It wasn't the Norton or the Bonneville, but it was love at first sight or sit if you prefer because when I got on it I knew it was for me.  Luckily the dealer took pity on me and agreed to deliver it to my home free of charge which was fortuitous since I had never ridden a motorcycle in my life much less had a license to drive one.
     I consider myself lucky that I was allowed to grow up on a farm which I must say came in handy for learning to ride your first motorcycle.  The kindly dealer warned me that the shift lever on a Triumph was on the right side of the bike, and that I should be careful at first while I adjusted to the fact that positioning of the shifter was opposite to every other motorcycle in the world.  In my case that didn't really matter much since I didn't know what the hell I was doing anyhow.  So after the bike was delivered I made preparations for my inaugural motorcycle ride.  I had a helmet and boots, I had a set of Malcolm Smith goggles, I had a make believe dual purpose 400 pound motorcycle with side pipes and trials universal tires, I had a ten acre field, and I was 22 years old, what could go wrong?  We won't go into details but needless to say I limped into the Triumph dealer the next day and purchased new shift and brake levers to replace the old ones that I just didn't care for any longer, twisted metal levers just never look as nice as straight ones.  To say the least I was lucky and learned a valuable lesson from my experience, and that is that motorcycles should come with a warning lable, THIS MACHINE HAS HIDDEN TEETH AND IF YOUR ARE NOT CAREFUL IT WILL BITE YOU ON THE ASS!
     After some continued practice at a somewhat reduced speed and cautions cornering I became a more proficient and careful rider, which was good since I did not think that my body or my wallet could stand too many more death defying encounters with mother earth.  I practiced in the field for about a week and then started sneaking out on the road at night to get and a feel for road riding before I went for my drivers test.  It was just after this that I discovered that the Trophy was much more suited for the street than the back roads and trails.  It didn't take long before the bike and I became homogeneous and I will always remember those warm summer evening rides on the back roads around my home as some of my the most enjoyable experiences I have had on two wheels.  What can I say, I am sure you are familiar with the old adage about your first love, I guess it is the same with your first motorcycle.  Unfortunately I was force to sell it when a few years later when my young wife became pregnant and I needed the $750 to pay for the hospital and doctor bill when my son was born.  Can you imagine a time when it only cost that much to have a child, no wonder the world is overpopulated.
     My next motorcycle was a 1972 Harley Davidson Sportster, well actually it was my wife's motorcycle.  Yes my little sweetie was a Harley Mamma!  But there is a perfectly rational explanation for her riding a Sportser, it was the only bike she was completely comfortable on and could hold up properly when she came to a stop.  In the long run though I rode it a lot more that she did and therefore can say unequivocally state that it was an engineering nightmare connected by two wheels.  How do I begin, first of all it was slow and when I say slow I mean it could be trounced by a good running CB 450 Honda, oh who am I kidding the Honda could have a hole in one piston and still manage to embarrass the Sprotster.  Ah, but what it lacked in speed it made up for with bad handling. My brother in law bought an identical Sportster to my wife's except for color and one night he was following me home form a local watering hole when his Harley decided that it wanted to become a dirt bike.  It seems that while he was negotiating a curve he suddenly sneezed and started the infamous Sportster head shake (which if you have ever experienced it you'll never forget it) when unseen demons take over control of your handlebars.  The best way I can describe it is that the front end becomes a victim of demonic possession, and starts whipping back and forth against the steering stops in an effort to commit murder/suicide.  The end result was that my brother in law went straight thru the curve careening off into the woods.  I remember looking in my mirror and seeing his headlight performing some really amazing feats of gymnastics as I tried to figure out if it was the alcohol we had consumed or he was just showing off.  After the dust cleared we managed to pull the bike out of the woods and luckily his Sportsers imitation of a rodeo bull had not done any permanent bodily damage.  He placed the Sportser up for sale the next day and it wasn't too long afterwards that my wife and I decided to sell ours.  Now you are probably thinking that the Harley folks out there will be getting mad at me.  Well the truth is even the most ardent HD rider will tell you that the AMF Harley years were a dark time for the venerable old company.  The bikes produced during the AMF onership were some really bad motorcycles and the Sportster might just have been the worst of the lot.
     It was around this time that my brother in law, father in law, and myself all fell victim to mental Suzuki Motor Corporation.  So much for the unanimous vote thing.  I won't go into details about our excruciatingly painful ten years in business, lets just say that I won't be buying a Suzuki product any time soon or looking to go into any other businesses with family.
illness and decided to open up a Motorcycle business!  We originally started with a repair and accessory shop which to our great surprise actually began turning a profit.  We were so pleased with our new found success we decided to send my brother in law to mechanics school for advanced training in order to take on more complex repair jobs.  When he returned he informed us that we would surely fail if we did not obtain a motorcycle franchise of some kind in the immediate future.  I thought this a bit strange since our store was already making money, but we decided to put it to a vote.  When we went into business we agreed that any vote had to be unanimous in order to be carried so when I voted no that was the end of it, except that my father in law and brother in law voted yes and two months later we were signing a dealership agreement with
     The whole thing was a giant waste of time except for the fact that I got experience riding some really great bikes and some of them were even Suzuki products.  When we got our first delivery of bikes the three of us each took a GT750 as a demonstrator, it was the first legitimate water cooled motorcycle, and it was immediately dubbed by nearly everyone "The Water Buffalo."  If water cooling wasn't radical enough the GT750 was powered by a two cycle motor, which was barely tolerated in this country on outboard motors, chain saws, Toro lawn mowers, and dirt bikes, but thoroughly looked down on by the average motorcyclist as a Gran Torismo  machine.  The oil was fed to the motor from a tank that fed an injector system that shot oil into the crankcase which was then scavenged through ports to be burned along with the gas and oil, thereby creating a lovely little trail of blue smoke whenever you applied large amounts of throttle.  To make matters even better the initial motors came with defective crank bearing seals and proceeded to self destruct at their earliest opportunity.  Gee, lets see ridiculed for  being water cooled, blues smoke in the faces of your fellow riders, and a motor that blew up almost immediately after being delivered, not exactly a great start.
     As I said it was painful to live through those early days, but things did get better, Suzuki fixed the problem with the cranks, we discovered synthetic two cycle oil (no thanks to Suzuki) which eliminated the smoke and Suzuki began equipping  the bikes with dual disc brakes up front that made the GT stop on a dime.  I owned two of these machines and I can tell you that they were an absolute pleasure to ride.  Being a two stroke the motor had no hard braking tendencies at all, unlike our in-line four cylinder four stroke competitors bikes that nearly threw you over the handlebars if you chopped the power too fast.  It had good power and would cruise all day long at seventy miles per hour.  Perhaps the most extraordinary thing was the bikes torque, you could let the RPM's drop down to 2500 and then with just a twist of the throttle it accelerate straight up to red line with an uncanny smoothness that seemed almost electric like.  All in all it was just a rider friendly bike, and it will always have a place in my heart a motorcycle that I really enjoyed riding.
   Suzuki GT 250 for a while which boasted a two stroke motor, six speed transmission, and magnificent handling for its time.  The GT 250 was actually just an updated and dressed up version of Suzuki's beloved X6 Hustler, which early on was their largest displacement production motorcycle.  The Hustler enjoyed mild success with the general public but it was a smashing hit on road racing courses and can still be seen dressed up in its GP style bodywork at vintage motorcycle races throughout the world.  Next time we'll examine another of our shrewd business moves as my all knowing brother in law decided we should take on an Italian line of motorcycles in order to really get our business rolling, here's a hint, it wasn't Ducati, or any of the well known Italian manufacturers.

Monday, November 23, 2015

Does size really matter?

Does size really matter?
     A few posts ago I alluded to the fact that motorcycles with more than 100 BHP  may be close to going the way of the Dinosaurs, Dodo Bird, and chastity belt.  Well that doesn’t seem to be on the horizon yet, but the trend towards smaller more versatile motorcycle platforms does seem to be gaining a little momentum.   While the motorcycle giants are still locked in a battle for the title of “Horsepower King” (Kawasaki seems to be winning by the way with the Kawasaki Ninja H2 Turbo boasting a mere 300 BHP) they all seem to be hedging their bets by producing lighter, smaller displacement machines for the commuter and casual  enthusiast.
     Probably the most surprising effort has come from Ducati Motor Holding S.p.A. who built their reputation and owner following on race bred machines that roar around race tracks throughout the
world.  But this time Ducati dipped into their past to bring back a name and a look when it introduced the new Ducati Scrambler 803 Classic, and you would have to look hard
and wide to find another motorcycle introduction that has met with this much success.  Following up the phenomenal sales of the 803 the Italian motorcycle maker is introducing a smaller version of the same style with a 399 cc
L-Twin power plant called the Scrambler Sixty2.  To give you an idea of the impact these models have had, company profits are up 22% for the first half 2015 and they have sold 50,000 units (a company record for a single year) as of November 11, 2015.  Now to be sure the fact that the price of the 803 which starts at just $8495 is certainly a big part of the sales surge, you have to remember, they are called Scramblers, which infers partial off road use.
      Ducati’s new found success in the mid-size motorcycle market has sent minor shock-waves through the industry but only time will tell just what effect it has on designs, but I think one can see a trend beginning to deve
lop.  Motorcycle manufacturers were already producing ever growing numbers of multipurpose motorcycles with BHP ratings under the controversial one hundred mark.  Suzuki for instance has just announced a new and improved SV650 sporting a new aluminum frame and enhanced fuel injection.  The SV650 is a stylish bike with descent power that is designed to attract a wide demographic rider base.  BMW Motorrad who has built a reputation for large horizontally opposed road cruisers, now offers no less that nine models of 800 ccs’ or less, including the new G310R that will be powered by a 313cc single cylinder motor and will probably go around the world on one tank of gas.
     Honda has announced newly updated models of the NC750X and the ve
nerable CB500 now designated as the CB500X.  Honda also now makes five so called scooter designs including the all new “Metropolitan” the good looking grandchild of the slightly successful Honda Super Cub which has sold to date somewhere around a mere 80,000,000 units and still counting.  Even the rejuvenated Indian Motorcycle Company has just announced a new Indian Scout that boasts a downsized 999cc motor that puts out 74 horsepower.
     So what’s driving this trend to downsize motorcycle engine size?  Well like many other trends there are a lot of forces that are influencing the manufacturers.  First of all we need to look at the technology equation.  Fifty years ago it took 1000 ccs to produce 75 BHP, today manufacturers achieve the same horsepower out of a relatively tame motor configuration of around 650 cc’s not to mention the 600 Sportbike Class that makes insane amounts of power for its engine displacement size.  Secondly consumers are getting more and more insistent about wanting vehicles that will server more than one function mirroring the rise of the Sport Utility Vehicle class of automobiles.  Next is the fact that the emerging economies of Asia don’t have the room or the road systems for one liter sportbikes or even cruisers for that matter, and manufacturers are just salivating over the astronomical number of potential buyers found in these regions.
     So is the liter plus motorcycle a dying breed, well not unless the governments of the world decide to demonize them in the minds of the public for political purposes, or as I remember from the muscle car days of my youth, insurance companies make them just too darn expensive to own.  I feel if there is a change in the ratio of large displacement machines verses the lighter smaller displacement models it will probably come from the tastes and demands of the buying public.  But then what do I know, if you had told me twenty years ago that riders would go wild for 1200 cc dual purpose Enduro style motorcycles sporting 150 plus horsepower power-plants, that they actually rode on the dirt, I would have called for the boys in the white coats to come and take you away.

Friday, November 20, 2015

Pan and Zoom Use

Pan and Zoom
     Today’s videographer has a plethora of options when it come to video editing products.  Your choice of video a matter of preference and is strictly up to you, but I will say that all video editors are n

Which one do I choose?
ot equal or there would probably be only one version made.  As far as cost, editors range from thousands of dollars to free, so you should determine what amount of sophistication you need for your projects before choosing one.  In other words if you are looking for an editor to dress up you family videos then one of the free versions like AVS Video Editor will more than server your purpose, and don't get me wrong there are some video projects that have been produced from AVS software that are truly award winning.  On the other hand if you are an aspiring film maker with your sights set on a career in the entrainment business you might want to invest a little more money in order to get a product with more flexibility and features.
     Now, that being said here is the sad truth, no amount of software gimmicks, can make up for basic camera work and project preparation.  The content you choose for your film is up to you and I don’t propose to tell you that any one subject is better or more likely to succeed than another.  If I could do that I would be laying beside a pool in Beverly Hills counting my billions.  There are however some constants that I feel will always be inherent to a good film or video production.                        
Blue Breasted something or other
     Know your subject, we live in a critical world and there are amateur critics everywhere out there just waiting to pounce on you from their keyboard.  There is nothing more embarrassing than having someone come up to you and inform you that the rare Blue Breasted Bug Snatcher shown in your film doesn’t actually eat green and red Carpet Crawling Worms, he actually prefers the green and yellow variety.  Boy, how embarrassing!  Now the whole world will know that I really didn’t finish that book on the habits of the stupid little Blue Breasted something or other.  This might seem far fetched, but if you think so take a look at this website (http://www.moviemistakes.com/) which is devoted to catching mistakes in films and tv.
     The next most common pitfall for videographers is the use of Pan and Zoom.  If you have read my other posts then you will know that I don’t care too much for the use of Pan and Zoom for most video sequences.  They have their place but using them too often can produce an amateurish look to the production.  If you just love these two tools and can’t imagine not using them then let me make this suggestion, use them sparingly and when you do use them make the rate almost indiscernible.  Two of the greatest examples of the correct way to zoom are John Wayne’s introduction scene in “Stagecoach” (https://www.youtube.com/watch?v=Wb4Q3jtyapc) and Chief Brody’s beach scene in “Jaws” (https://www.youtube.com/watch?v=rW23RsUTb2Y) I have posted the Youtube links so you see how the zoom adds drama to the scene.  As for the Pan tool I can’t emphasize too strongly to use this technique sparingly.  The slower the pan the more natural the scene seems, and not to mention it helps build tension or interest where as a quick pan is hard for the viewer to follow.  Finally never. never, ever reverse your pan and go in the other direction during the same scene, unless it is done for a comic effect.  I have included a short video clip that I took on a visit to the Skyline Drive located in Shenandoah National Park, Virginia, it demonstrates the same clip played at fast and slow speeds.  I think the video can speak for itself as far as which one is more pleasing to look at.
     Last but not least there is an old saying in the television and movie business and that is, “it’s not what you see, it’s what you don’t see.”  Long scenes are hard to shoot, and get boring if the view doesn’t change, so when you are videoing a subject it is best if you can set up at least two cameras.  I know two cameras sounds expensive, but the secondary camera need not be a first line device.  As my primary camera I use a Canon Vixia G30 that set me back more than a few pesos, and believe me it is worth it.  I also have a Samsung TL 350 and a Gopro Hero3+ that cost total about one third as much as the Canon.  But when I want to capture an important scene I set all three cameras up with a different view of the scene.  By doing this I make the Canon my primary camera but I always have the option of splicing in scenes from the other camera which will give me a totally different view of the same scene.
     In conclusion it takes practice to become efficient at making video or film products, but there are no limits to how far it can take you.

Saturday, November 14, 2015

Video Overlays

Using Video Overlays
     Today’s technology advances and changes so rapidly that it is hard to stay up with what is current.  When I think of the advances that have been made since 1973 when Kodak employee Steven Sasson invented and developed the first digital camera I find it hard to believe.  Sasson’s work was quickly followed up in 1976 by Steve Wozinak and Steve Jobs who began marketing a machine (the Apple 1) capable of manipulating the new digital images.  In just 42 years we have made advances that are unparalleled and unequaled in history when it comes to cameras, computers, and image editing software.
     Think this might be overstated?  Consider this, paper was invented by the Chinese somewhere around 100 BC, but it took until 1857AD, (a mere two-thousand years) befor a man named Joseph Gayetty invented and began selling a product called “toilette paper.”  The first bow and arrows were apparently used about 10,000  years ago, but it took another 7,500 years for man to improve upon it and develop the first crossbows!  I could go on forever but the point of all this is that ever since Texas Instruments rolled out its first integrated circuits in the early 1960’s we have been on the fast track when it comes to advancement in computers, software and particularly how they relate to the photographic fields.
     Fifty years ago it took huge studios who employed hundreds if not thousands of people and utilized immense movie lots and stages to produce a single moving picture like “Gone With the Wind”.  Today small groups of technologically gifted wizards can produce computer generated effects that would stun Jack Warner or Cecil B. Demille all from the comfort of their office chairs seated in front of a computer.  While most of us cannot hope to equal the talent of these digital magicians there is a video effect that can produce some pretty impressive results even in the hands of an amateur for an almost paltry cost.  That tool is the overlay or layer tool utilized in video editing software.
     Let’s take a look at what we can do with a simple overlay in a video editing program, if you have read my other posts then you know I primarily use Corel products and in this case I will be using Corel Videostudio 8.5 Ultimate.  The primary thing I wish to show you is how to overlay a photo or video over another photo or video, but I am also going to be touching on the advanced motion tool which I think you will like.  I have posted a set of progressive photos here to show you some of the steps involved and finally I have created a short video to show you the results.
Videostudio 8.5
Video Tracks
So lets start with Image 1, as you see it is a snapshot of Videostudio 8.5 completely blank except for two image icons, one of a cartoon desert, and one of the moon on a
blue background.  Now the primary or base image will be the desert scene which we will place
in the main video track window.  The image of the moon which will be our overlay is then placed into the first overlay track, and let me mention here that by going to track manager you can open as many as 20 additional overlay tracks.

Open Chroma Key
Blue disappears 
     Next I double click the image in the overlay track and a new box appears and I select the Mask & Chroma Key option, when that opens I select the box marked apply overlay options.  After I have done this you will notice that the blue background around the moon has disappeared, and now I am ready to add some motion to my overlay image.  Next I will open the Advanced Motion box by selecting it and add some motion to the overlay.  I will start by making the moon image smaller and placing it in the upper left corner of the display, if you look at the time line you will see that the first diamond is red.  I then selected the end diamond and move the endpoint on the screen to the lower right corner and make the moon image much larger.  Then I click okay and the effect was applied, and finally I exported the finished 5 second movie out in MP4 format so it would be compatible with the internet.  I have posted the short film here so you can see the effects in action.
Advanced Motion
Setting the motion path

     In conclusion, overlay tracks are probably the most useful tool a video editor has at their disposal and they can be manipulated to create some great finished products without requiring a masters degree in programing to use.  

Thursday, November 5, 2015

Camera Accessories

The most essential camera accessories
     When it comes to buying accessories for a piece of basic equipment I think cameras might be the leader of the pack.  When film cameras ruled the world you needed quite a few accessories to go along with your camera if you truly called yourself a photographer.  When I started using a SLR camera back in the late 1960’s the term automatic, instant focus, and self adjusting were unheard of.  Unless of course those terms referred to how you automatically entered every camera store you encountered, and your eyes instantly focused on the latest most expensive gadget in the show case, and finally how the sales clerk self adjusted the weight of your wallet from full to empty.
     Today I push the shutter button of my SLR and it immediately corrects exposure, speed, focus, depth of field and an ever
Early light meter
increasing array of weapons all aimed at turning you into a would-be Ansel Adams.  What a shame none of you will be able to experience the feeling of trying to hold your camera, aim your light meter, focus the pre-set lens, and frame the shot all before the Golden Breasted one eyed topnotch berry plucker flies south for the winter.  Even when you were sure you had everything just right the chances of you getting a good photograph out of all this work was marginal at best.
If you happened to possess a chemistry degree, a rich father to

buy the dark room equipment, and by the way a room to serve as your dark room where no one would be bothered by noxious smells drifting through the air, then with five or ten years of practice you could produce good looking prints.  If you didn’t have a rich father, spare room, or ten years to spare, you took your exposed film to the local processing center where you stood a better chance of seeing Elvis in person than getting back fine quality prints.  But alas, that was then and now is now, so we will be dealing only with current camera accessories.
     Let’s start with lenses, if you purchase one of the box store camera-lens combinations like the Canon, or Nikon sell chances are it will come with the standard 18-55 mm lens.  While these lenses are adequate for taking photos at your child’s birthday party they are pretty limited everywhere else.  If you are going to have only one lens then save up for one that will serve you well for nearly all your needs.  My advice would be to go with a 18-135 mm lenses made by the manufacturer of your camera box, these lenses are not cheap, ranging from $400 to $600, but they will serve you well due to their light gathering ability.  These lens also produce extremely accurate focus and color reproduction due to their low 3.5 aperture capability.  135 mm is a decent zoom level for an amateur since the greater the zoom the more susceptible the camera is to shake and blur.  I know those combo offers with the 18-55 and 75-300 telephoto lenses are tempting but ask yourself that always joy killing question, why are they so cheap, and also consider that unless you skilled at changing lenses you run the risk of contaminating your image processor and mirror with airborne dust and dirt which is a serious concern.
     Next thing you need is a good camera carrying case, while there are literally thousands of them out there I recommend a good hard case like a Pelican or Ibex.  Yes they are heavy, and yes they are
bulky, but they are also waterproof, nearly crush proof, and will survive baggage handlers at airports, train stations, and border crossings.
     Next camera strap, an absolute necessity, I buy the best and most comfortable camera strap that I can find.  I can’t tell you how many times my strap has saved my
$1200 camera from destruction, and if you travel and don’t use one, then I hope the guy who steals the camera right out of your hand gets some good images of you chasing him.
Tripod overkill
     Tripod, sounds so innocent doesn’t it, well for a modern still camera it is.  Still cameras (unless you are using it as a video camera) are not very picky about a little shake or shimmy, but if you intend to do video and use your telephoto feature then you are going to need a rock steady tripod.  And here in lies the problem, I have never found a so called stable tripod that didn’t require you to hire a porter to carry it around for you.  Believe me the terms light and portable, are not interchangeable with the phrase “vibration and shake free”.  My solution has been to own two tripods, a light weight portable model for random field shoots, and a more substantial model that I am considering equipping with wheels and a motor to make it easier to move.
     Motion stability devices are coming out faster than one can keep up with, they range in price from a few hundreds of dollars to quite
a few thousands of dollars.  For the beginning professional or avid amateur I feel the hand held 3 axis models designed for a Gopro or similar sports cameras is adequate for capturing those moving shots that make videos captivating.  I feel that purchasing one of these stabilizers would be a welcome addition to any photographers .
     Last but certainly not least we have the ultimate camera accessory, “The Drone Copter.”  The advances that have been made in stabilized helicopter flight simply boggle my mind, I have flown RC aircraft for about 45 years and believe me these critters are amazing.   They offer features like stabilized hover, fully stabilized camera systems, return to home, first person view (seeing what the camera is seeing), gimbaled camera platforms, and in some models waypoint navigation (the ability to program the quad to fly autonomously).  From a theoretical standpoint these machines are thrilling, from a practical and legal standpoint they represent a live hand grenade with a partially pulled safety pin.
     The FAA is still trying to come up with a comprehensive plan for handling the drone issue and you should make yourself aware of the rules that are already in place before sinking a lot of cash into one of these awesome flying cameras.  Drones are presently outlawed in all national parks, a great many state parks, and within five miles of any airport, not to mention the court system is beginning to rethink its stance on personal privacy rights concerning unauthorized aerial filming.  I think the money you would spend on a drone could be better used to purchase one or more of the accessories I discussed previously, at least until the government makes up its mind as to how great a threat they pose.
   

Tuesday, November 3, 2015

Green Screen Use

Green Screen Techniques
I tought I saw a putty cat!
     In a previous post I touched on the use of green screen as a tool for video production and in this post I will elaborate on that and also include some tips for adding a green screen image to  your videos.  First of all lets consider how you can get green screen images and videos for your use.  The simplest way is to acquire images that are offered for free like this one of a Bengal Tiger that I copied from Google Images.  The same goes for Green Screen videos, a simple search for green screen videos will yield quite a few sites where you can download a variety of pre-made green screen subject matters.  Some care should be taken though if you intend to use these products in a commercial venture since there could be copyright issues.   The exception to this is the “Fair Use” condition which simply states that if you are offering your work for educational purposes (like this blog) you may use public photos in your work.  The best way to avoid problems like this of course is to produce your own original work when you are going to use it commercially, as a matter of fact Google will suspend your partners account for copyright violation.
Not that's a gun!
     So how do you produce green screen products of your own?  Well, if you are talking for photo use, it can be quite simple.  For example let’s take that green screen photo of the Tiger and add it to an existing photo like our Civil War cannon.  I am using Corel Draw and Corel Photo Paint software to make my green screen effect on my photos, but there are many other products that would do just as good a job.  First I opened Corel Draw and selected a new page, then I imported our green screen tiger image and our cannon image onto the page.  I then selected the green screen tiger and chose the edit bitmap command which automatically opens the Photopaint application.  I then used a color mask which lets you select a particular color range which in this case we want to be green so we can remove it, leaving you the remaining color ranges.  I then used a simple cut command to remove the tiger and went back into Corel Draw and selected the paste command, and magically my tiger with no green screen background appeared on the page.  After this it was a simple matter to do some resizing and adding of a shadow to create the new image of the cannon and the tiger, which is something you just don’t see everyday.
Maybe he was a mascot?
     Video is a bit more challenging but it is without a doubt the media form that makes the most use of green screen effects.  From movies to weather reports, to commercials, to Youtube uploads, the green screen adds action that enhances any video.  The phrase green screen by the way is just a generic term for what is technically called, “Chroma Key Compositing” or “Chroma Key” and the color used for chroma keying doesn’t actually have to be green.  For instance I produce a DVD for one of the National Civil War Battlefield Parks and I use National Park Service Ranges as narrators.  I have to video them in front a blue screen instead of green due to the fact that they wear green trousers and if I used green for the Chroma Key color their legs would disappear!
Green Screen and frame
Starter light set
     The major difference between chroma keying a video rather than a photo is that to do a photo you can work on a much smaller scale, in fact you may not even have to employ anything other than your computer and some image enhancing software.  Doing Video on the other hand can get more expensive.  First you have to have an area to hang the chromakey screen which sounds easy but remember the screen must go nearly from floor to ceiling, and if you intend to show your actors feet it must run along the floor also.  Proper lighting is crucial or you will have shadows and bright spots that will be difficult to deal with when you go to key them.  Lights and screens can run into quite a tidy sum so my suggestion is to start small.  You can go to most large hobby stores and purchase a piece of 32X40 foam backer board from the framing department and then go to the fabric department and buy a piece of fabric in the color appropriate for your project and cover the board with it.  Next experiment with small items, maybe even use puppet techniques to test you skills.
     Hopefully you will have success employing Chroma Key Composition because it can open up a world of possibilities for you in your video and photographic production.